Everything you need to run bookings on your own site — from installing the plugin to connecting calendars, taking payments, and sending reminders. Organized into 13 topics, each with the exact steps and what you'll see on screen.
01 · Getting started
From zero to a live booking page
Install the plugin, connect a calendar, set up one meeting type, and share your link. Six short steps — most people are live in about ten minutes.
1 · Install & activate the plugin
Plugins → Add New → Upload
Get the plugin from the J6 Venture website or the WordPress plugin directory. In your WordPress admin, go to Plugins → Add New → Upload Plugin, choose the .zip, and click Install Now, then Activate.
Once it's active, a new J6 Calendar menu appears in your WordPress sidebar. That's your home for everything below.
2 · Take a look at your dashboard
J6 Calendar → Dashboard
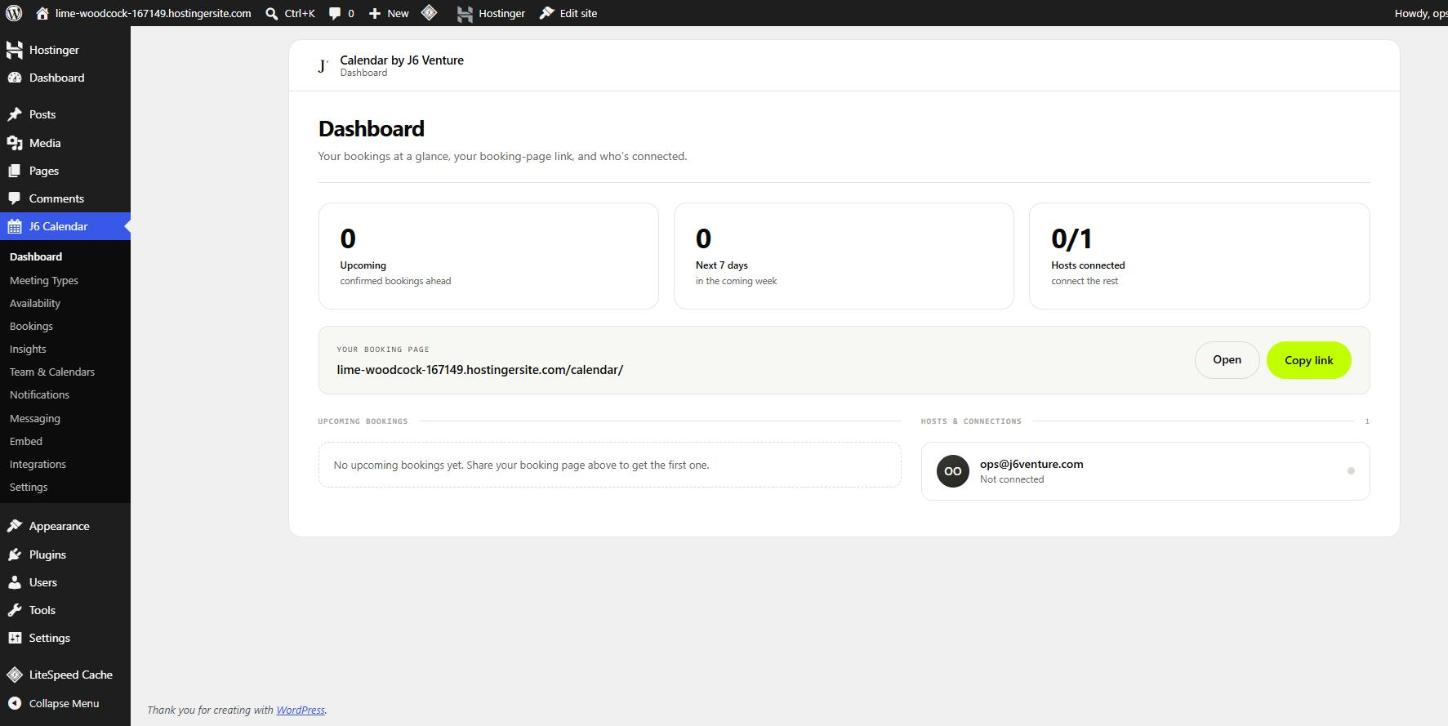
Open J6 Calendar from the sidebar. The dashboard is your at-a-glance view: upcoming bookings, how many hosts are connected, and your public booking-page link with Copy link and Open buttons. On a fresh install you'll see zeros and one host that isn't connected yet — that's your next step.
Dashboard A fresh install — your booking link is ready even before you connect a calendar.
3 · Pick how you'll connect your calendar
J6 Calendar → Team & Calendars
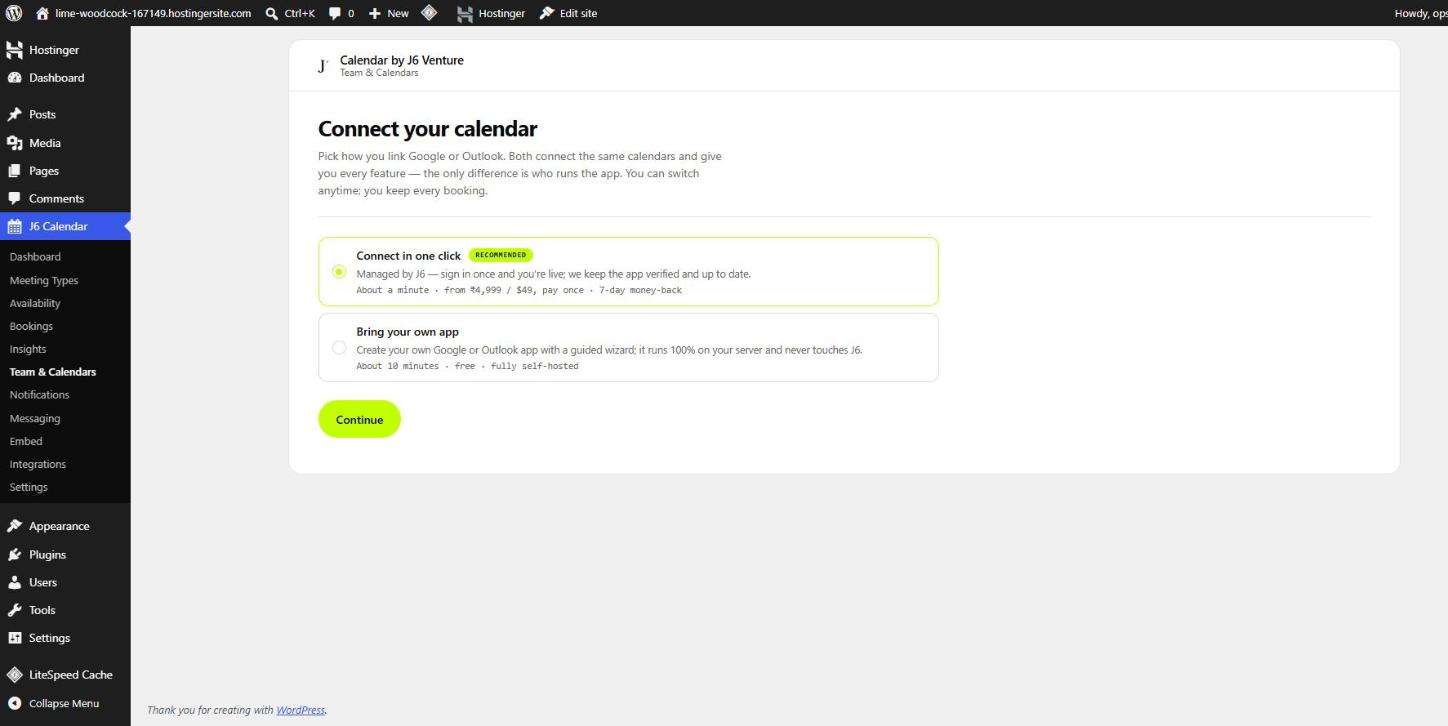
Go to Team & Calendars. You choose how hosts link Google or Outlook — both options connect the same calendars and give you every feature; the only difference is who runs the app.
Connect in one clickRecommended — managed by J6. Each host just signs in; there's nothing technical to set up. A one-time charge, with a money-back window.
Bring your own app — create your own Google or Outlook app with a guided wizard. It's free and runs entirely on your server. Takes about ten minutes.
You can switch between the two later without losing any bookings or connections.
Team & Calendars Choose one-click (managed) or bring-your-own-app (free, self-hosted), then Continue.
4 · Connect your calendar
Sign in with Google or Microsoft
After you continue, you'll sign in with Google or Microsoft and grant calendar access. Only calendar permissions are requested — never your email inbox. Once it's done, the host shows as Connected, and from then on the booking page reflects your real free/busy times and new bookings are written straight to your calendar.
NoteBookings still work before a calendar is connected — they're recorded and the invitee is emailed. They just won't create a calendar event or a video link until that host connects.
5 · Set your booking-page address & timezone
J6 Calendar → Settings → Booking page
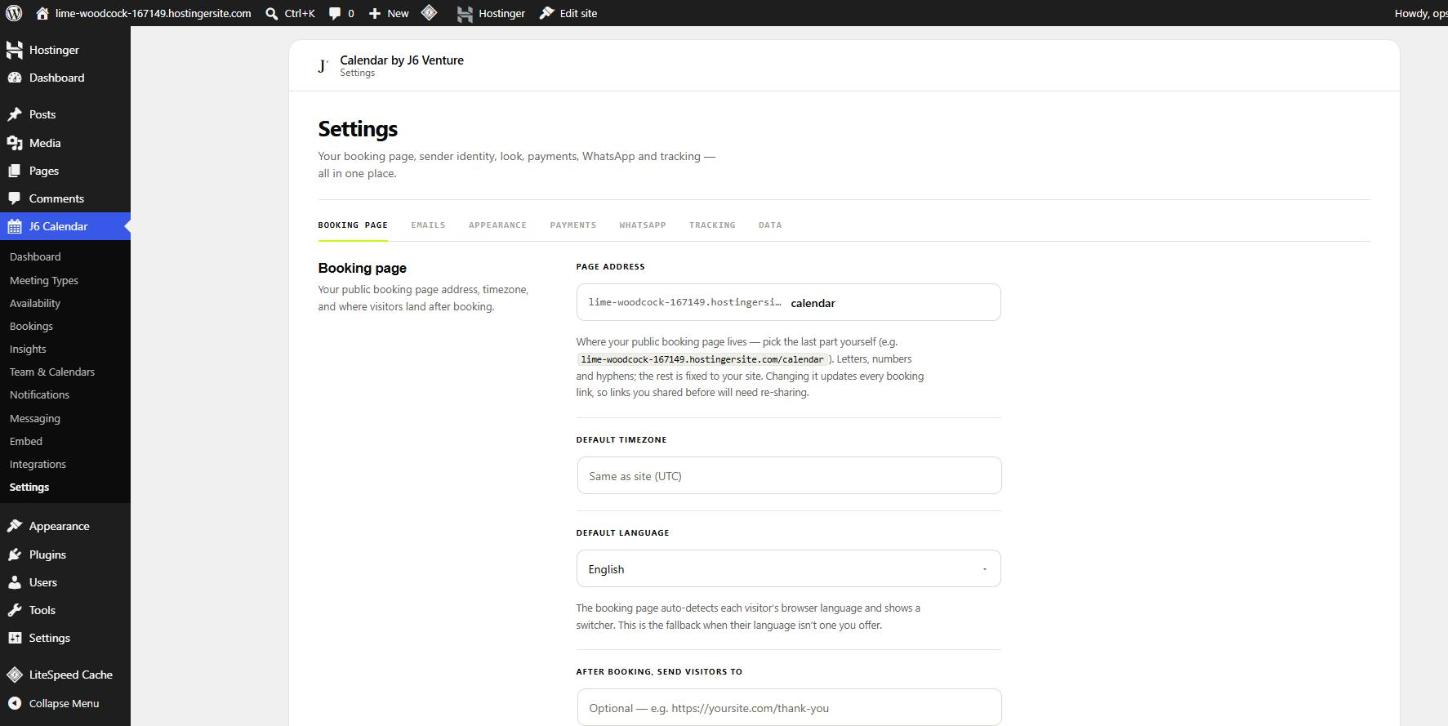
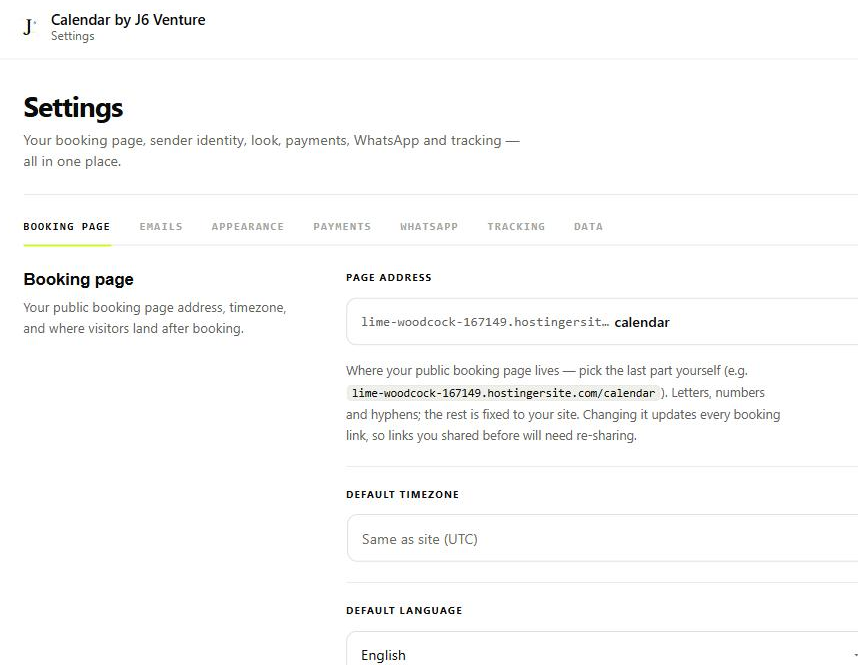
Open Settings. On the Booking page tab you set the last part of your public URL (your page address), your default timezone, the default language, and — optionally — a page to send visitors to after they book. Everything else adopts sensible defaults, so you only touch what you want to change.
Settings · Booking page Your public URL, timezone and language live here.
6 · Create a meeting type
J6 Calendar → Meeting Types
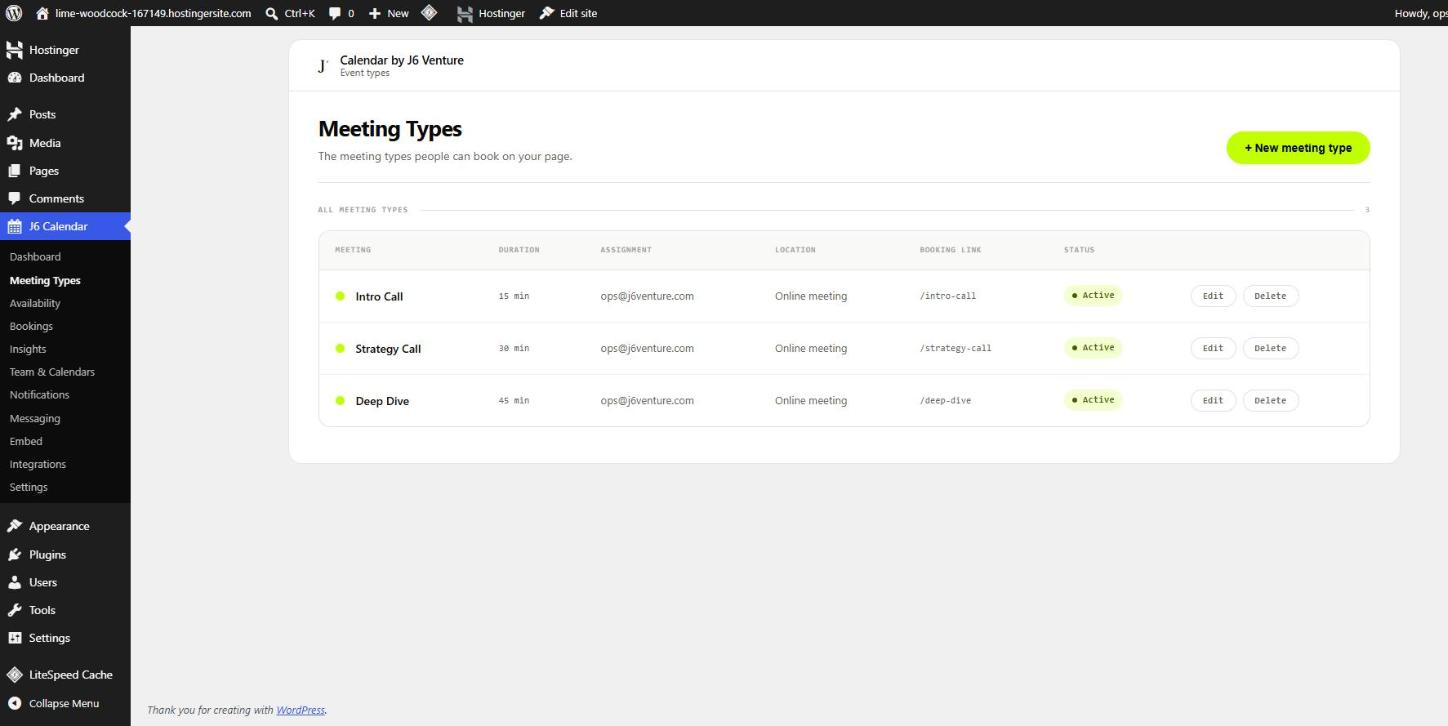
A meeting type is a kind of appointment people can book — an intro call, a strategy session, a demo. The plugin ships with three examples so you can see the shape of things; edit those or add your own with + New meeting type.
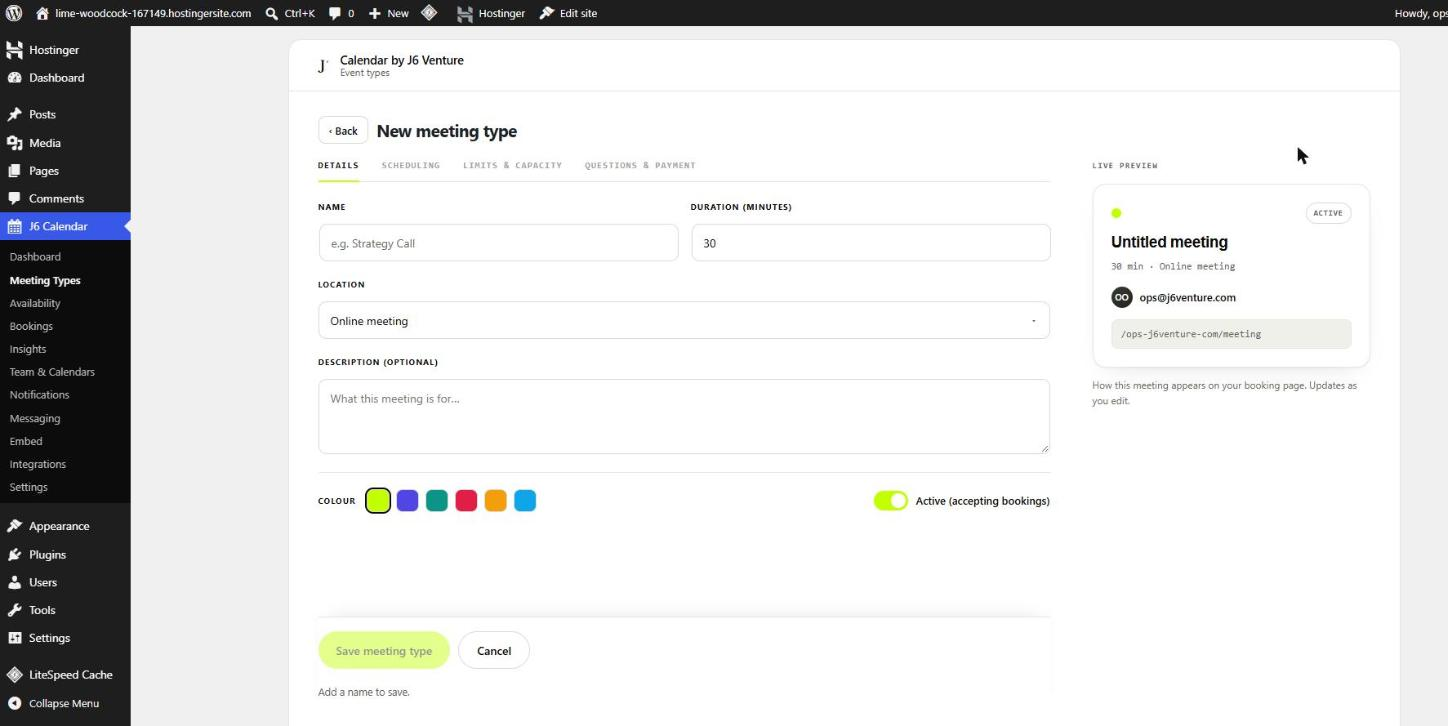
Give it a name, a duration, and a location (an online meeting link, a phone call, in person, or your own link), then Save. The live preview on the right shows exactly how it will appear to invitees.
Meeting Types Three starters come pre-loaded — edit them or add your own.New meeting type Name, duration and location are all it takes. Save stays off until you've named it.
7 · Share your booking link
Dashboard → Copy link
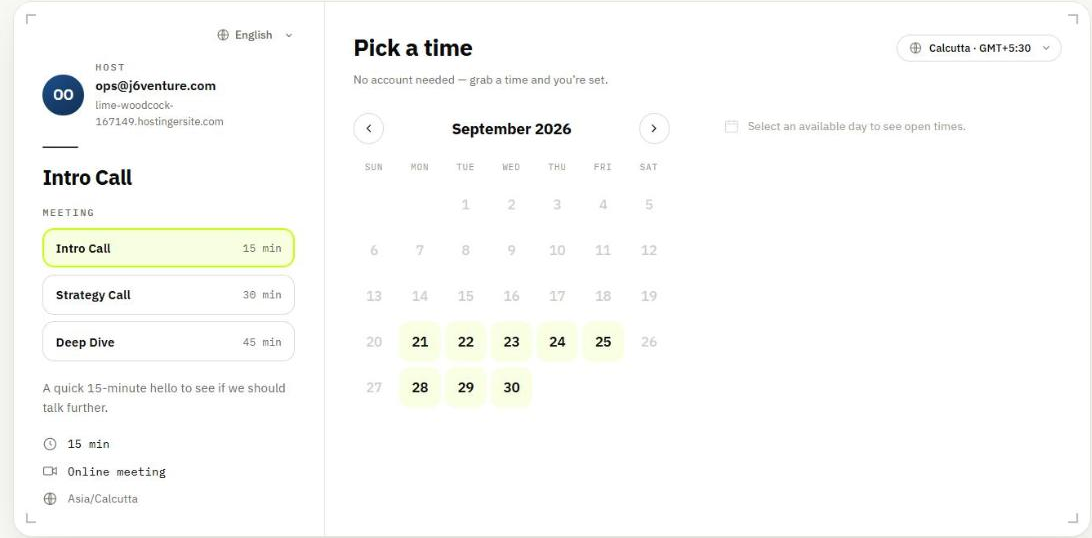
You're live. Back on the Dashboard, use Copy link (or Open) to grab your booking-page URL and share it anywhere — email signature, website button, DMs. Invitees pick a meeting type and an open time, with no account needed, and see times in their own timezone.
Your booking page What invitees see — pick a meeting, pick a time, done.
02 · Connecting calendars
Google & Outlook, both ways
Connecting a calendar is what turns your booking page from a static form into a real scheduler — it reads your true free/busy times and writes new bookings straight to your calendar. There are two ways to do it, and both give you every feature.
Which method should I choose?
Team & Calendars → Connect your calendar
The choice is only about who runs the connector app — not what you get. Both connect the same Google or Outlook calendars.
Connect in one click
Managed by J6
Sign in and you're live in about a minute — nothing technical to set up. One-time purchase per host, with a 7-day money-back window.
Bring your own app
Free · self-hosted
Create your own Google or Outlook app with a guided wizard — free and 100% on your server. About 10 minutes, and comfortable with a short technical setup.
When to use which
Pick one-click if you just want it working now and would rather not touch Google Cloud or Azure. It's the right call for most people.
Pick bring-your-own-app if you're comfortable with a 10-minute developer setup, want it completely free, or need the connection to never involve any third party (some IT/compliance teams require this).
You can switch later either way — your bookings and existing connections are kept.
Team & Calendars Choose your method, then Continue.
Option A · Connect in one click (managed)
Choose plan → activate key → connect each host
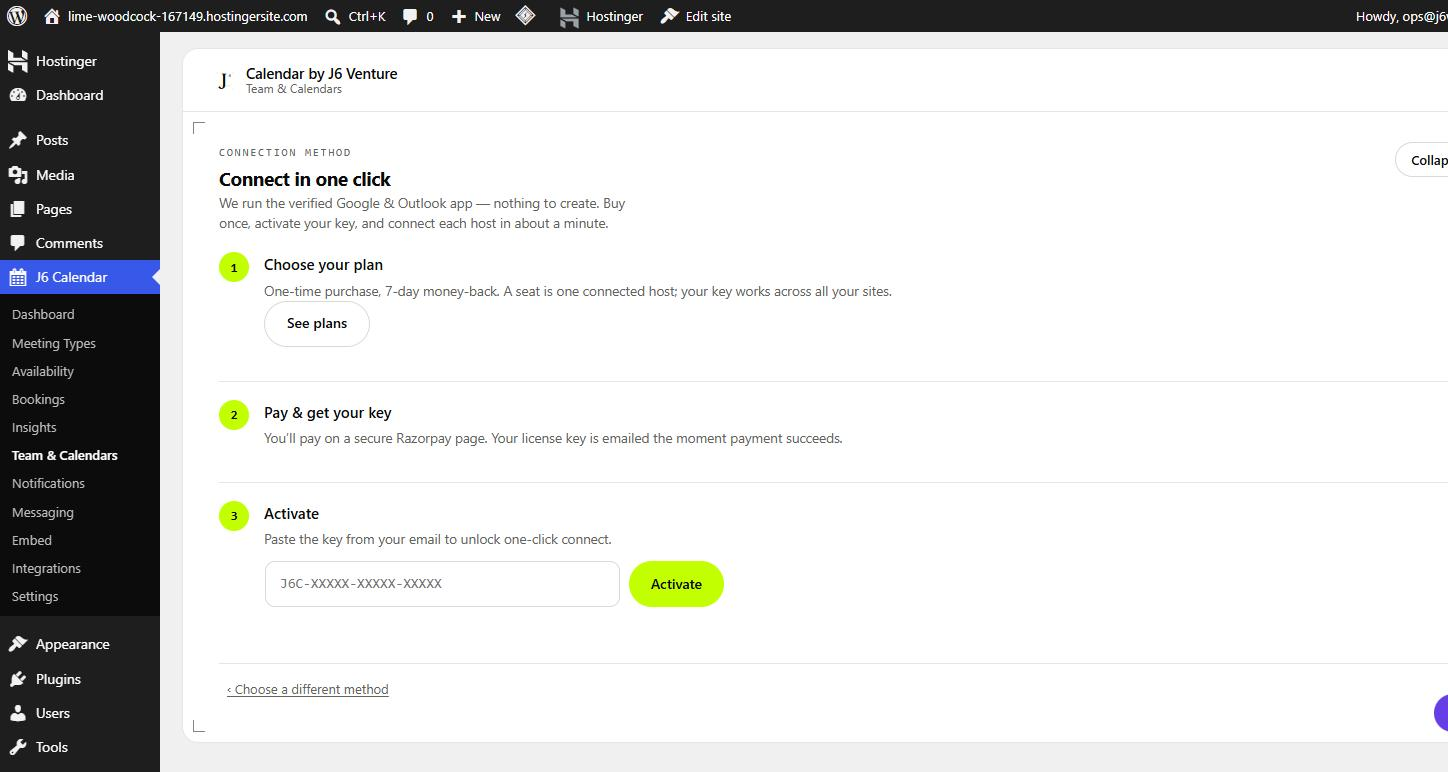
J6 runs a verified Google & Outlook app for you, so there's nothing to create. It's a three-step flow:
Choose your plan. A one-time purchase. A seat is one connected host, and your key works across all of your sites.
Pay & get your key. You pay on a secure Razorpay page; your license key is emailed the moment payment succeeds.
Activate. Paste the key (it looks like J6C-XXXXX-XXXXX-XXXXX) and click Activate. Then each host clicks Connect and signs in with Google or Microsoft — done.
One-click connect Buy once, paste the emailed key, then each host signs in.
Good to knowThe 7-day money-back window means you can try it risk-free. And because a seat follows your account (not one website), the same key activates the plugin on your other sites too.
Option B · Bring your own app (free, self-hosted)
Pick a provider → paste your app keys
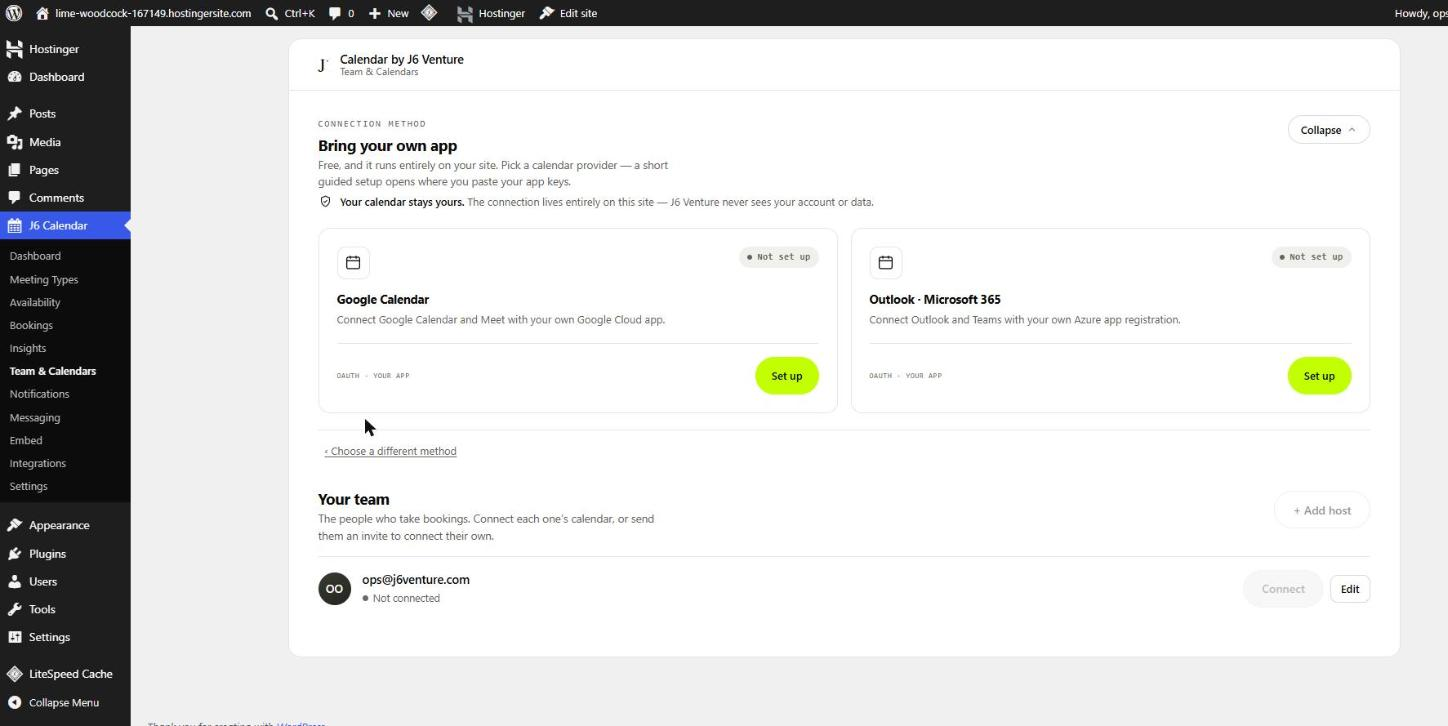
Here you create a free app in Google Cloud or Microsoft Azure and paste its keys into the plugin. The connection then lives entirely on your site — J6 never sees your account or data. Pick a provider and click Set up to open its guided wizard.
Bring your own app Set up Google or Outlook with your own developer app.
Set up a Google app (bring your own)
≈ 10 minutes · one-time
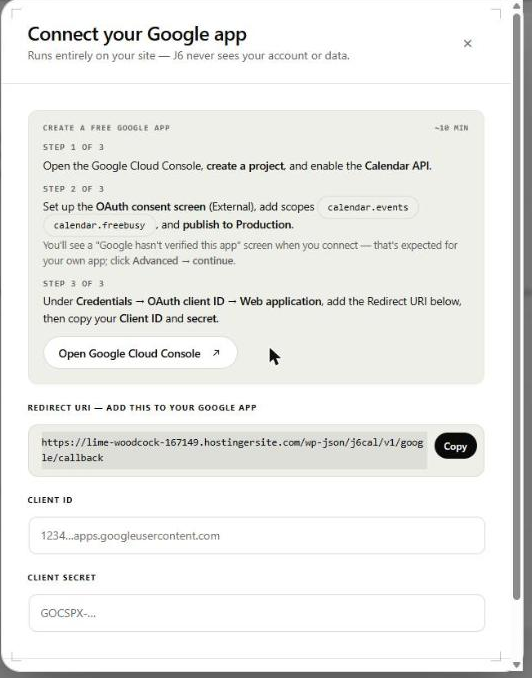
The wizard lays out three steps and gives you the exact Redirect URI to paste into Google. In the Google Cloud Console:
Create a project and, under APIs & Services → Library, enable the Google Calendar API.
Open the OAuth consent screen, choose External, and add just two scopes — calendar.events and calendar.freebusy. Then publish the app to Production.
Under Credentials → Create credentials → OAuth client ID → Web application, paste the plugin's Redirect URI, then copy the Client ID and secret back into the plugin.
Do this or your connection breaks weekly
Google leaves a new app in Testing mode, which expires the connection every 7 days. Publishing the consent screen to Production is the one step that prevents constant reconnecting — don't skip it. (You'll see a "Google hasn't verified this app" screen when you connect your own app — that's expected; click Advanced → continue.)
Google wizard The steps, the redirect URI, and where your keys go.
Set up an Outlook / Microsoft 365 app (bring your own)
≈ 10 minutes · one-time
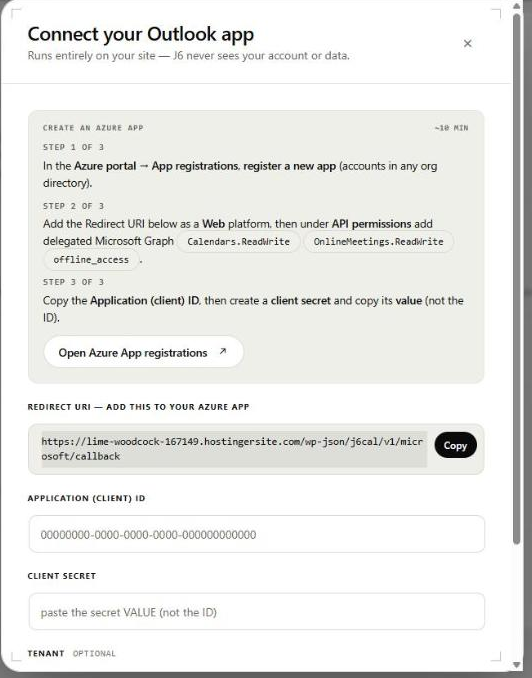
Same idea, in the Azure portal under App registrations:
Register a new app, choosing accounts in any organizational directory.
Add the plugin's Redirect URI as a Web platform. Under API permissions, add these delegated Microsoft Graph permissions: Calendars.ReadWrite, OnlineMeetings.ReadWrite, and offline_access.
Copy the Application (client) ID, then create a client secret and copy its Value (not the ID) into the plugin.
Two common mix-ups
Copy the secret's Value, not its Secret ID — they sit next to each other and only the Value works. And add offline_access, or the connection can't refresh itself and will drop.
Outlook wizard Register in Azure, grant Graph permissions, paste the keys.
Switching, reconnecting & disconnecting
Team & Calendars
You can switch between one-click and bring-your-own-app anytime — your bookings and connections are preserved. To reconnect a host (say a token expired) or disconnect one, open Team & Calendars, find the host in Your team, and use Connect / Edit. Each host has their own connection, so one reconnecting never affects the others.
If a host isn't connectedBookings still work — they're recorded and the invitee is emailed. They simply won't create a calendar event or a video link for that host until they connect. The dashboard's "hosts connected" count is the quickest way to spot anyone who still needs to.
03 · Meeting types
Shape every kind of booking
A meeting type is a kind of appointment people can book. Everything about how it's booked lives in four tabs inside the editor — Details, Scheduling, Limits & Capacity, and Questions & Payment. Most settings have sensible defaults, so you only touch the ones you care about. This topic walks each control and, more importantly, when you'd actually use it.
The basics — name, duration, location
Meeting Types → + New meeting type → Details
Give the meeting a name (what invitees see), a duration, and a location. The live preview on the right updates as you type. Choose a colour so it's easy to spot across the admin and booking page, and leave Active on so people can book it.
Choosing a location
Online meeting — a video link is created automatically on each booking (Google Meet for Google hosts). Best default for calls.
Custom link / phone / in person — paste your own Zoom/Teams link, ask them to expect a call, or give an address. Use these when you don't want an auto-generated video room.
Details Name, duration and location — the live preview mirrors your booking page.
Scheduling — the timing controls
Editor → Scheduling
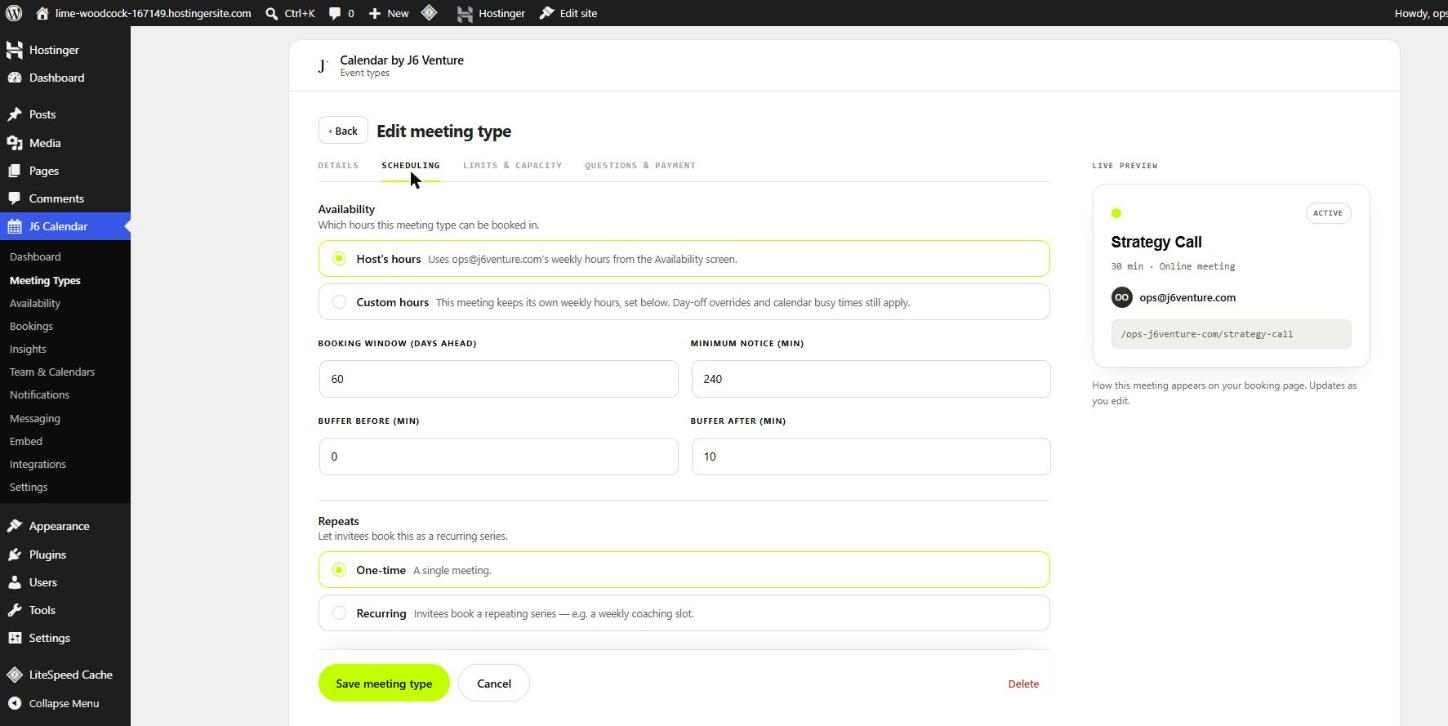
This tab decides when the meeting can be booked. Four numbers do most of the work, and each solves a specific real-world problem.
Scheduling Hours, window, notice, buffers and recurring — all in one place.
Booking window (days ahead)
How far into the future people can book. Keep it short (e.g. 21–30) if your schedule changes a lot and you don't want commitments months out. Go longer (60–90) for planned engagements like onboarding or coaching.
Minimum notice (minutes)
The shortest lead time before a slot — 240 means "no bookings inside the next 4 hours". Set it to the time you need to prepare or avoid being ambushed. A quick intro call might be 60–120; anything you need to prep for is better at 1440 (24 hours).
Buffer before / after (minutes)
Padding the plugin holds around the meeting so bookings never land back-to-back. Buffer after gives you time for notes or travel; buffer before gives you time to prep. A common setup is 0 before, 10–15 after.
Host's hours vs Custom hours
By default a meeting uses your normal weekly hours (from the Availability screen). Switch to Custom hours when this one meeting should only be offered at special times — e.g. "I only take demos Tuesday and Thursday afternoons." Your days off and real calendar busy-times still apply either way.
One-time vs Recurring
Leave it One-time for a normal single meeting. Choose Recurring only when an invitee should book a repeating series in one go — like a weekly coaching slot or a standing check-in.
Limits & Capacity — protect your time
Editor → Limits & Capacity
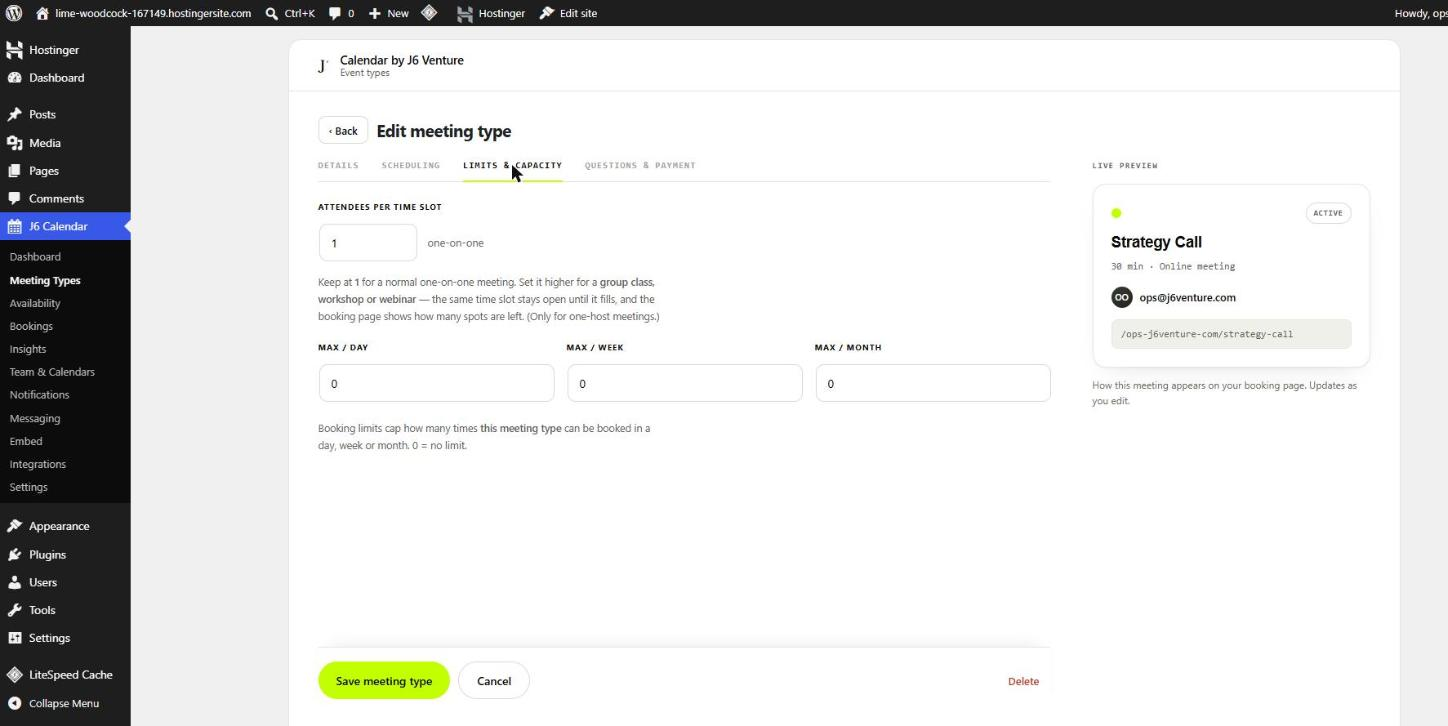
Two independent controls here: how many people can join one slot, and how many of this meeting type can be booked overall.
Limits & Capacity Group size, and daily/weekly/monthly caps.
Attendees per time slot
Keep it at 1 for a normal one-on-one. Raise it only for a group class, workshop or webinar — the same slot stays open until it fills, and the booking page shows how many spots are left. (Group slots are for single-host meetings.)
Max per day / week / month
0 means no limit. Set a cap when you want to protect your energy — e.g. "at most 3 discovery calls a day" — so a busy day can't fill entirely with one draining meeting type. The cap counts this meeting type only.
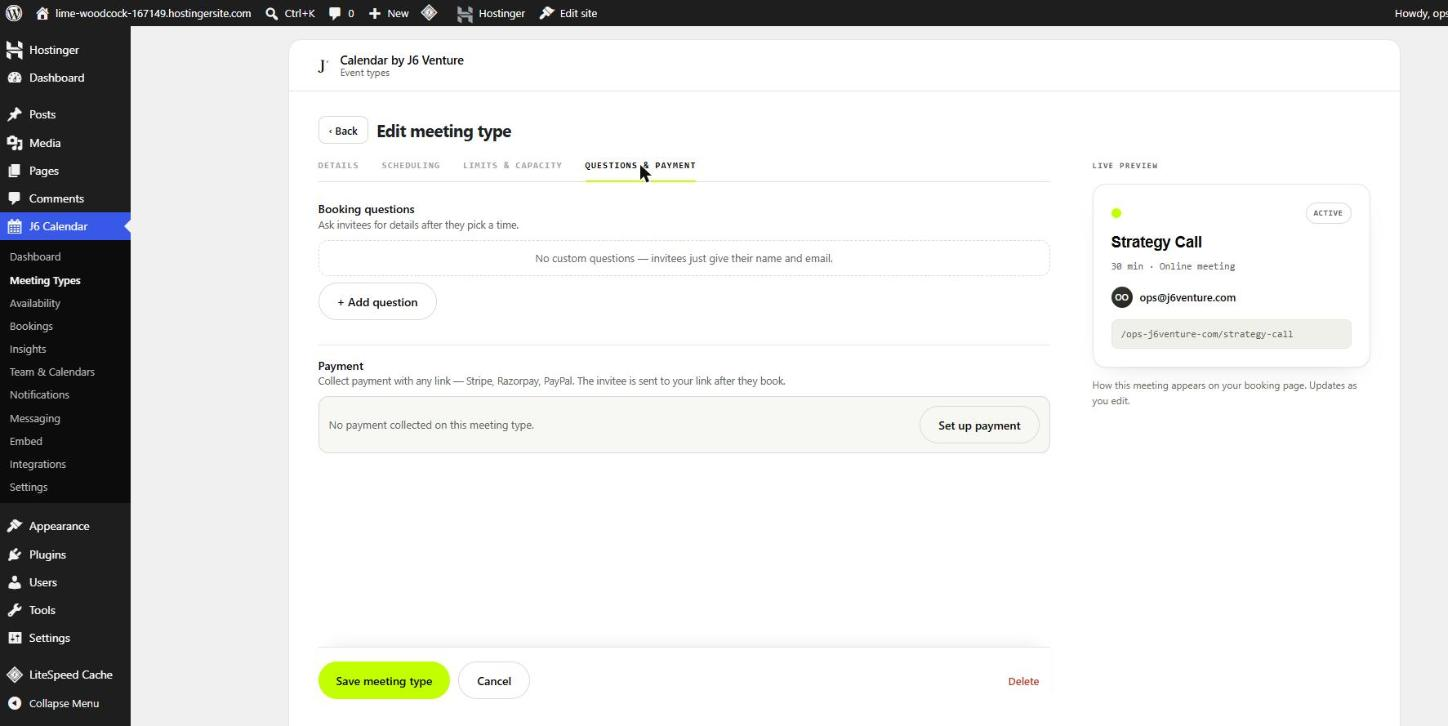
Questions & Payment
Editor → Questions & Payment
Ask for what you need before the call, and — if the meeting is paid — send invitees to your payment link after they book.
Questions & Payment Custom questions and an optional payment link.
Booking questions
Invitees always give their name and email; add questions for anything else you need — a short answer ("What's this about?"), a multiple choice (budget range, team size), or a file upload (a brief, a resume). Keep it to what you truly need — every extra field lowers the number of people who finish booking.
Collect payment
Attach any payment link — Stripe, Razorpay, PayPal — and the invitee is sent to it right after booking. Use it for paid consultations so the slot and the payment happen together. (Full setup, including auto-confirming paid bookings, is in Topic 8 · Payments.)
Who hosts it — single, round-robin, or pooled
Appears once you have 2+ connected hosts
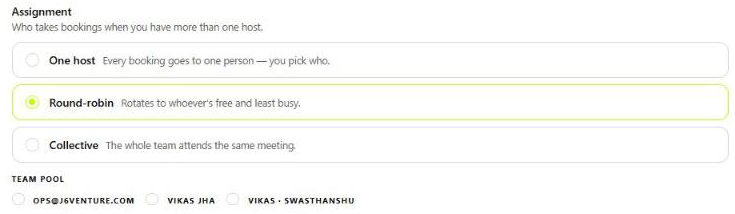
With a single host, every booking goes to that person. Once your team has two or more connected hosts, an Assignment choice appears so you can decide who takes each booking:
Single host — always the one person you pick. Simple and predictable.
Round-robin — the plugin spreads bookings evenly across the team and offers the invitee the soonest available person. No one gets overloaded.
Pooled (collective) — the meeting needs everyone in the pool free at the same time, so the booking page only shows slots when all of them are available.
When to use which
Round-robin fits a shared queue — a sales or support team where any qualified person can take the call, and you want fair distribution and the fastest slot for the customer.
Pooled fits meetings that genuinely need specific people together — a panel interview, or a call where both an account manager and a specialist must attend.
Assignment Pick Round-robin or Collective, then tick which hosts sit in the pool. This block appears once two or more hosts are connected.
04 · Availability
When you take meetings
Availability is the frame every booking has to fit inside. It's two layers working together: the weekly hours you set here, and the real busy times read from your connected calendar. An invitee only ever sees a slot when it's inside your hours and your calendar is free — you never double-book, and you never have to block times by hand.
Set your weekly hours
Availability → Weekly hours
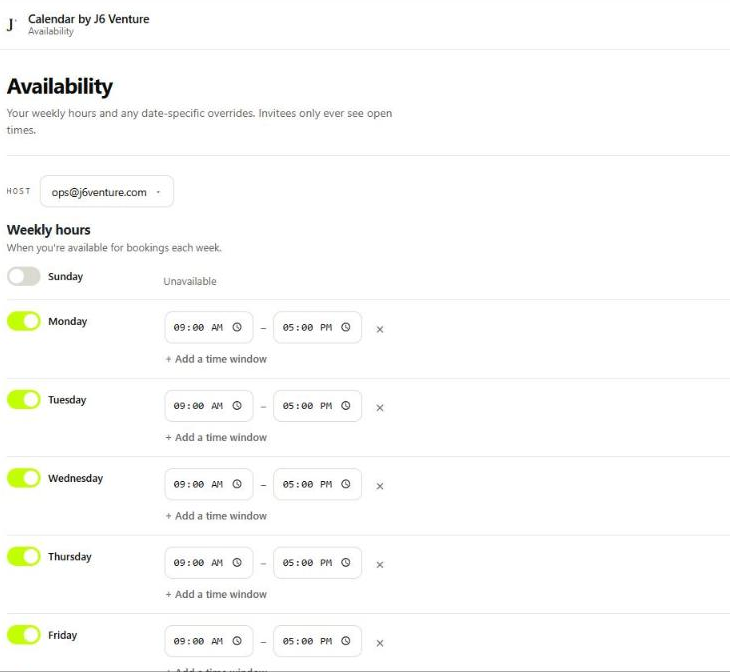
Turn on the days you take meetings and set a start and end time for each. Days left off show as Unavailable and are never offered. This is your normal week — individual meeting types can narrow it further with custom hours, but they can never open a time you haven't allowed here.
Weekly hours Toggle a day on, set the times — the "Times are in" note shows which time zone these hours are read in.
On a team: whose hours?
The Host selector at the top switches whose availability you're editing. Each host keeps their own weekly hours and time zone, so a booking on a shared meeting type only lands when that host is both open and free.
Split hours — leave a gap like lunch
Availability → + Add a time window
A day can have more than one window. Click + Add a time window and you get a second start/end on the same day — the gap between them simply isn't bookable. Use it for a lunch break, a school run, or a "mornings only until 12, then 3–6" split. Add as many windows as a day needs.
When to split vs shorten
If you just finish earlier some days, one shorter window is enough. Reach for a split only when there's a real protected gap in the middle you never want booked over.
Date overrides & days off
Availability → Date overrides
Weekly hours repeat every week; a date override changes one specific date. Use it two ways: block a day off entirely (a holiday, travel, a conference), or set special hours for a single date (e.g. "open 8–10 only on the 14th"). Overrides win over the weekly pattern for that date, and everything goes back to normal the next day.
Override vs calendar busy
You don't need an override just because you have an appointment — a real event on your connected calendar already blocks that time automatically. Reach for a date override when you want to change your bookable hours for a date, not just mark yourself busy.
Time zone
Shown next to your hours
Your hours are stored and shown in your own time zone (the "Times are in…" note). Invitees always see slots converted to their time zone on the booking page, so "2 PM" for you shows correctly for someone in another country — no mental maths, no missed calls from a zone mix-up. Each host on a team carries their own zone.
How free/busy blocking works
Automatic, once a calendar is connected
This is the half that runs on its own. Once your calendar is connected, the plugin reads your busy times and hides any slot that overlaps one — meetings, all-day events, other bookings, anything already on the calendar. It only reads free/busy, not the details of your events. So the times people can book are always the intersection of "inside my weekly hours" and "actually free right now," kept current without you touching a thing.
If busy times aren't blocking
Almost always the calendar isn't connected (or the token expired) — check Team & Calendars for a green Connected status and use Reconnect if needed. Only events on the connected account block; a separate personal calendar you never linked won't.
05 · Team & hosts
Add your teammates
A host is anyone whose calendar can take bookings. On a solo site there's just one; on a team, each person is a host with their own calendar, hours and personal booking link. This topic covers adding hosts, getting their calendars connected — including a link they can use without ever logging into WordPress — and keeping the roster tidy. Team hosting needs the one-click Connect plan; the header shows how many seats you're using.
Add a host
Team & Calendars → + Add host
Give the host a name and a notification email (where their booking alerts go). Everything else is optional: a role/title and short bio that show on their personal page, a time zone, and a personal booking link — the last part of their URL. Leave the link blank and it's generated from the name. Adding a host just creates the record; their calendar is connected in the next step.
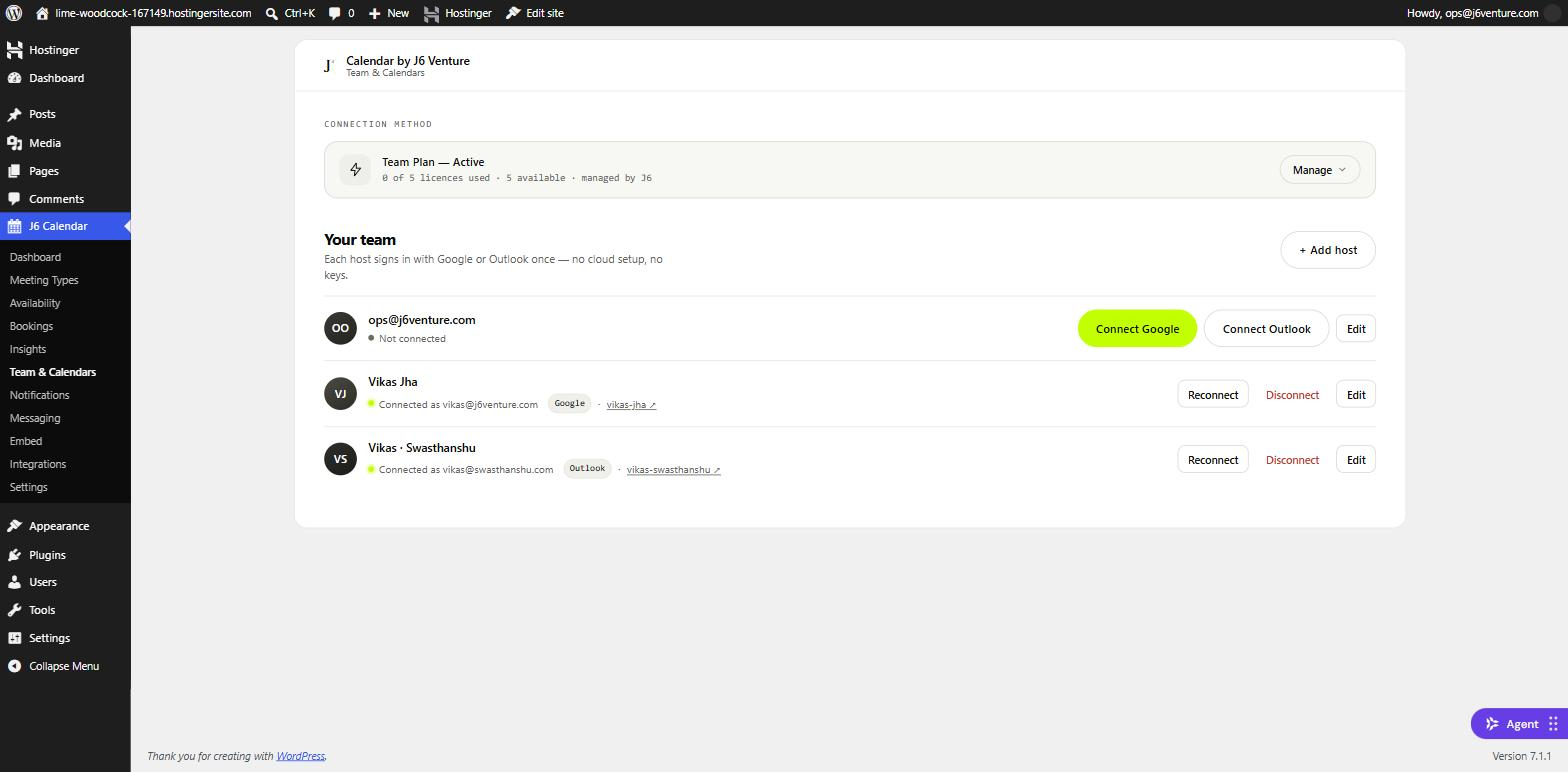
Your team Each host shows a live status — grey Not connected, or green Connected with the provider (Google / Outlook) and their personal link.
Seats & the plan header
The Team Plan row shows licences used vs available (e.g. "2 of 5"). A seat is taken when a host connects a calendar, not when you add the record — so you can list the whole team first and let people connect as they're ready.
Connect a host's calendar — two ways
Team & Calendars → Connect Google / Connect Outlook
Every host needs their calendar linked so bookings land there and busy times block automatically. You can do it for them right from the admin — click Connect Google or Connect Outlook on their row and sign in — or let them do it themselves without any admin access (next article). Either way it's one sign-in, no app setup and no keys, because the connection is brokered by J6 on the Connect plan.
Which button?
Match the host's own calendar: Connect Google for Gmail / Google Workspace, Connect Outlook for Microsoft 365 / Outlook.com. A host can only be connected to one calendar at a time; use Reconnect later if they ever switch accounts.
Invite a host to connect themselves
Team & Calendars → Send invite
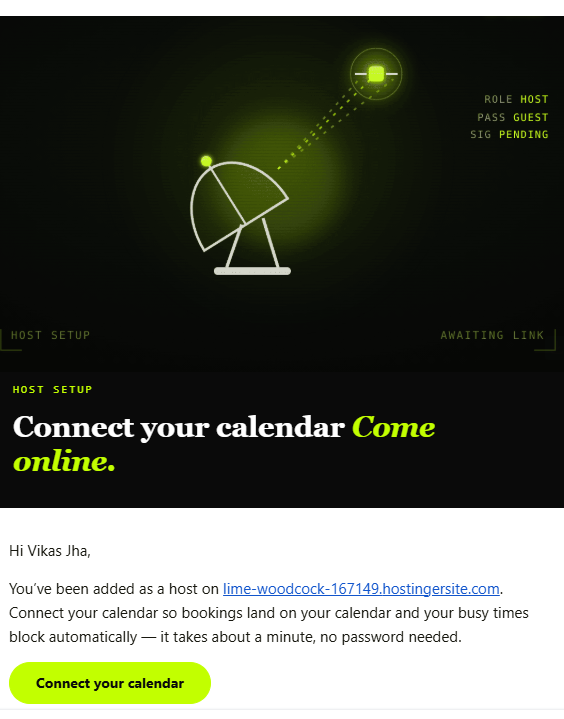
This is the tidy way to onboard teammates: click Send invite on their row and they get an email with a single Connect your calendar button. They never need a WordPress login, a password, or anything technical — the link is theirs alone and works for 14 days.
Invite email What the teammate receives — one button, no password, about a minute to finish.
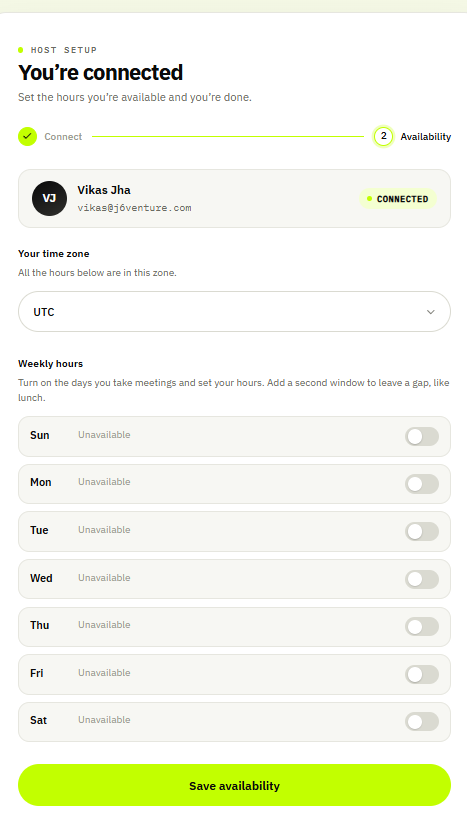
The button opens their personal host setup portal. They pick Google or Outlook, sign in once, and land on a "You're connected" screen — no admin, no keys.
Host portal · connected Step 1 (Connect) is done; the host now sets their own time zone and weekly hours.
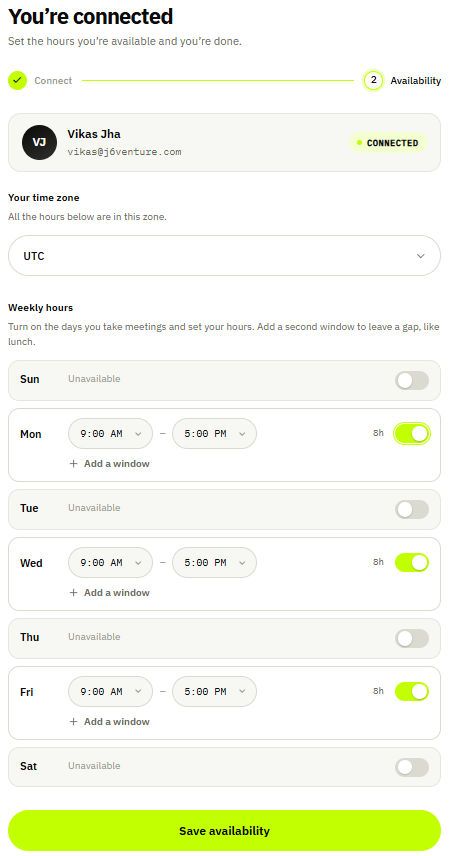
On the same screen they turn on the days they work and set start/end times — and can Add a window to leave a midday gap like lunch. They press Save availability and they're live. Nothing they do here touches the rest of your site.
Host portal · hours The host owns their own schedule — split windows and time zone included.
Invite vs connect-for-them
Use Send invite when the host manages their own calendar and you'd rather not touch their sign-in — the cleanest option for real teams. Use Connect Google/Outlook from the admin when you're setting someone up while sitting with them, or connecting a shared inbox you control.
Round-robin & collective meetings
Meeting Types → editor → Assignment
Once two or more hosts are connected, any meeting type can share bookings across them. Round-robin spreads bookings evenly and offers the soonest free person; Collective needs the whole pool free at once. You choose the mode and tick which hosts are in the pool inside the meeting-type editor — the full walk-through is in Topic 3 · Meeting types.
Manage the roster — reconnect, edit, remove
Team & Calendars → Edit / Reconnect / Disconnect
Each host row has the controls you need over time. Edit changes their name, role, bio, time zone and personal link. Reconnect re-runs the sign-in if a token ever expires or they switch accounts. Disconnect unlinks the calendar (freeing the seat) while keeping the host record, so bookings stop landing there until they reconnect.
Before you remove a host
Deleting a host removes their personal link and takes them out of every pool. If they host any round-robin or collective meetings, reassign or re-pool those meeting types first so bookings keep flowing to the rest of the team.
06 · Booking page
Make it yours
Your booking page works out of the box — but it's the face customers see, so it's worth a few minutes making it feel like you. Address, brand, language and where people land afterwards all live under Settings; putting the page inside another site lives under Embed. Every setting has a sensible J6 default, so change only what you care about.
Your page address & time zone
Settings → Booking page
The page address is your public URL — you pick the last part (e.g. /calendar); the rest is fixed to your site. Letters, numbers and hyphens only. Set a default time zone for the page here too. One caution: changing the address updates every booking link, so anything you shared before will need re-sharing.
Settings · Booking page Address, time zone and language — the tab row up top is how you reach every other setting.
Language
Settings → Booking page → Default language
The booking page ships in English, Hindi, Spanish, French and German. It auto-detects each visitor's browser language and shows a switcher, so an international audience sees their own language automatically. The default language you set is just the fallback for when a visitor's language isn't one you offer.
Brand & appearance
Settings → Appearance
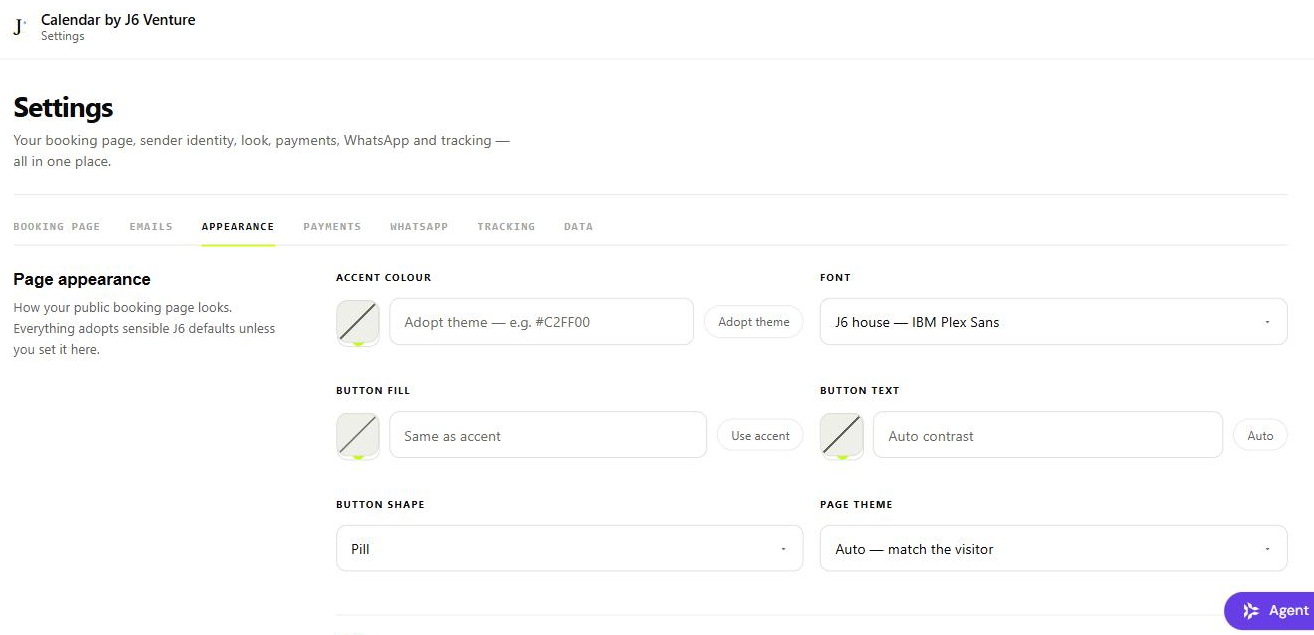
This is where the page becomes yours. Set an accent colour (or "Adopt theme" to inherit your site's), pick a font from a curated list, style the buttons (fill, text colour, and shape — pill / rounded / square), choose a page theme (auto / always light / always dark), add a logo, and write a one-line welcome line under your host. Everything falls back to clean J6 defaults, so even untouched it looks intentional.
Settings · Appearance Accent, font, button styling, theme and logo — small choices that make the page feel on-brand.
Fastest way to look on-brand
Set the accent colour to your brand colour and add your logo — those two do most of the work. Leave font and buttons on the defaults unless you have a specific brand font in mind.
Where visitors land after booking
Settings → Booking page → After booking, send visitors to
Leave this blank to show the built-in confirmation screen. Or point it at your own thank-you page — ideal for ad funnels, because the plugin appends ?j6_booked=… to the URL so your page can register the conversion. Pair it with the tracking setup in Topic 10 for full attribution.
Put the calendar inside another page
Embed
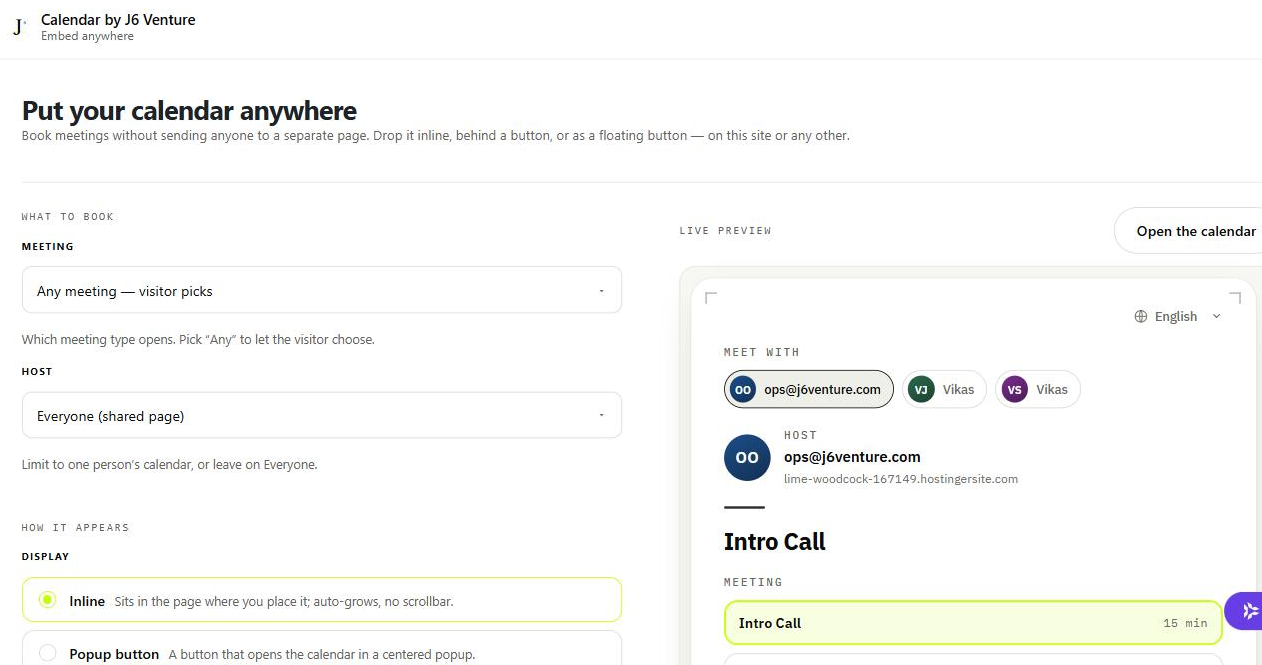
You don't have to send people to a separate page at all. The Embed screen builds a snippet you can drop into this WordPress site (there's a Booking calendar block) or any other site — Webflow, a plain HTML page, an email's landing page. Choose what to book (any meeting or a specific one; everyone or one host) and how it appears, and a live preview shows exactly what visitors will see.
Embed Pick what to book and how it appears — the live preview is the real widget.
Which display mode?
Inline sits in the page and auto-grows (no scrollbar) — best for a dedicated "Book a call" section. Popup button opens the calendar in a centered overlay — good beside a call-to-action. Floating button pins a button to the page corner on every page it loads — good for "always reachable" across a whole site.
07 · Notifications & messaging
Emails, reminders & WhatsApp
Good booking software is quiet in the right way: the invitee gets a clean confirmation, a nudge before the meeting, and updates if anything changes — without you lifting a finger. All of it is on by email out of the box. This topic is about turning messages on or off, changing their wording, adding reminders, and (optionally) sending on WhatsApp too.
The notifications matrix
Notifications
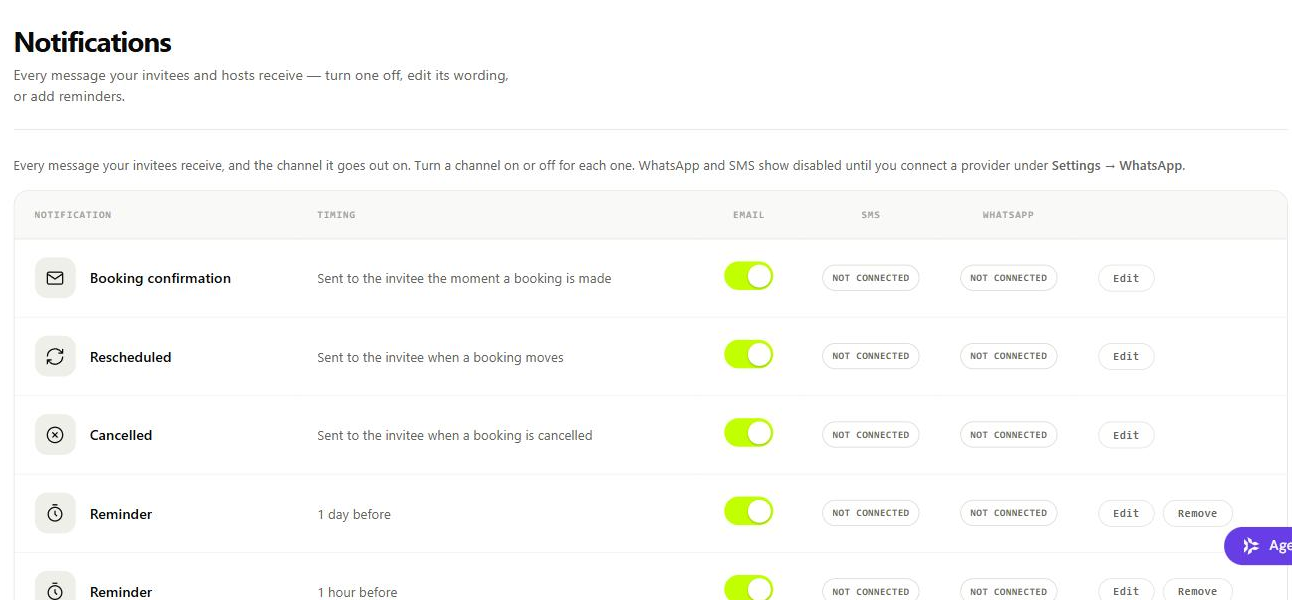
One screen controls every message your invitees receive. Each row is an event — Booking confirmation, Rescheduled, Cancelled, and any Reminders — and each has a channel toggle for Email, SMS and WhatsApp. Toggle a channel on or off per message, or hit Edit to change the wording. Email is ready immediately; SMS and WhatsApp stay greyed out until you connect a provider.
Notifications Every invitee message and its channels in one grid — Email on, SMS/WhatsApp shown until a provider is connected.
Reminder timing
Two reminders come set up — 1 day before and 1 hour before. Keep both for meetings people forget; drop to one for quick calls. Use + Add reminder for a third (e.g. "3 days before" for a paid session). Each reminder is its own row with its own channels.
Who your emails come from
Settings → Emails
Set the from name and from email so booking mail looks like it's from you, not the site default. There's also a toggle to email the host when a new booking comes in — leave it on so you're never surprised by a meeting on your calendar.
If emails land in spam
Use a from-address on your own domain (not a free Gmail/Yahoo) and make sure your site can actually send mail — most hosts need an SMTP plugin or a sending service (Resend, SendGrid, Amazon SES) wired into WordPress. Deliverability is a mail-server thing, not a calendar thing — see Troubleshooting.
WhatsApp reminders
Settings → WhatsApp
Booking reminders reach people far more reliably on WhatsApp than in an inbox. Two ways to connect: Periskope (a third-party gateway — a quick separate signup) or the official WhatsApp Business API. Set one up, choose which is live, and the WhatsApp toggles in Notifications light up. For WhatsApp to reach invitees you also need their number, so turn on the phone field in Settings → Booking page.
Periskope vs the official API — be honest with yourself
Periskope sends through an ordinary WhatsApp session, so it can send free-form text with no template approval — but it uses WhatsApp's consumer service, which breaks WhatsApp's Business terms and can get the number banned. Fine for testing or low volume. For anything you depend on, use the official Business API — approved templates, but it won't get you banned.
Reusable message templates
Messaging
Beyond the built-in notifications, the Messaging screen lets you build reusable templates (Email, SMS or WhatsApp) with merge fields like {invitee_first_name}. On their own they do nothing — you wire a template to a booking event under Automations (e.g. "when a Deep Dive is booked, send this WhatsApp"). Use it for anything the standard confirmations don't cover, like a prep checklist or a follow-up.
08 · Payments
Get paid for a booking
Paid consultations work in two layers, and it helps to keep them straight. Layer one — collecting the money — is a payment link you attach to a meeting type; the invitee is sent to it right after booking. Layer two — auto-confirming — is optional plumbing that flips the booking to "paid" the instant the money actually clears, so you're not reconciling by hand.
Attach a payment link
Meeting Types → editor → Questions & Payment
Any payment link works — Stripe, Razorpay, PayPal, a hosted checkout. Paste it into the meeting type and the invitee lands on it immediately after choosing a time. This alone is enough to charge for a call. Until the auto-confirm below is set up, a paid booking simply sits as awaiting payment until you mark it paid from Bookings. Full field details are in Topic 3.
Auto-confirm when the money clears
Settings → Payments
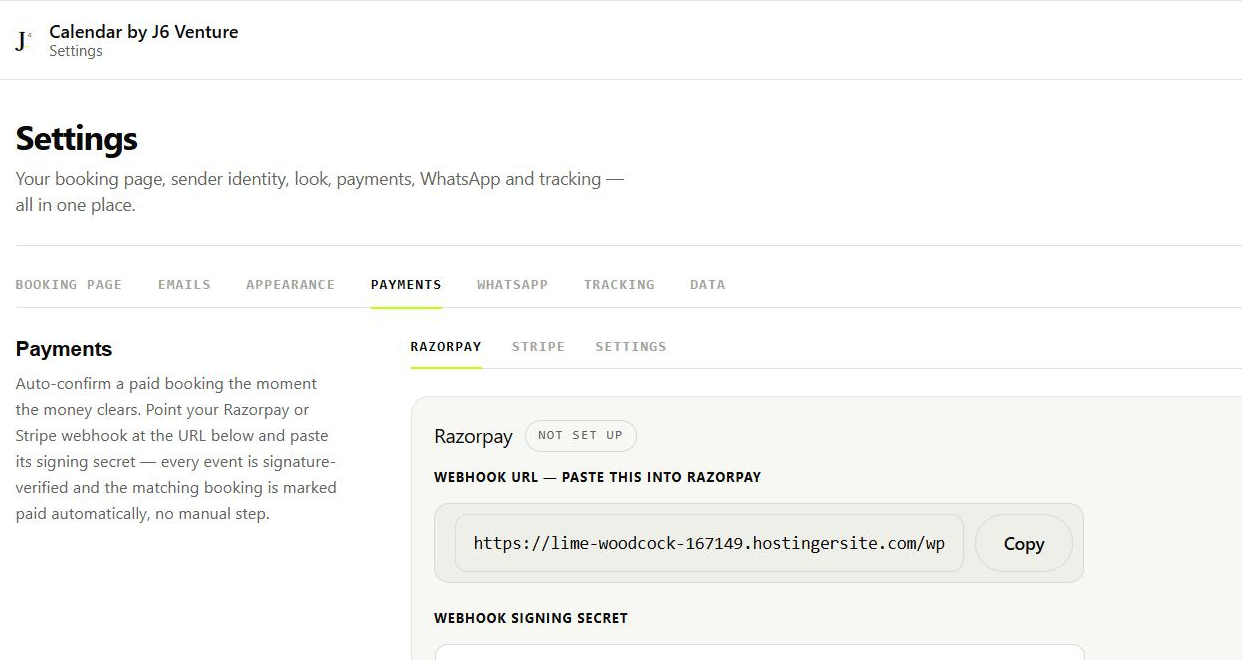
To skip the manual step, connect a webhook. Under Settings → Payments pick Razorpay or Stripe, copy the webhook URL shown, paste it into that gateway's dashboard, and paste the gateway's signing secret back here. From then on, every payment event is signature-verified and the matching booking is marked paid automatically — no manual reconciliation.
Settings · Payments Copy the webhook URL into your gateway, paste its signing secret back — that's the whole setup.
One webhook per gateway
Set up the gateway you actually use to charge. Each has its own URL and its own signing secret — don't cross them. The signature check means a forged "paid" call can't sneak a booking through, so the secret matters: paste it exactly.
Mark a booking paid by hand
Bookings → a booking → Mark paid
You don't need webhooks at all if your volume is low. Take payment however you like, then open the booking in Bookings and mark it paid. The auto-confirm webhook simply automates this one action — it's a convenience, not a requirement.
09 · Managing bookings
After a time is booked
Every appointment someone books lands in Bookings — the running record of who's meeting you, when, and everything they told you on the way in. It's also where you act after the fact: reschedule, cancel, or mark a payment received. The calendar event and the invitee's emails are already handled automatically; this screen is for the human follow-ups.
The bookings list
Bookings → Upcoming / Past / All
Three tabs split the list by time: Upcoming for what's ahead, Past for history, All for everything. Each row shows the invitee, the meeting type, the time, and status. Open a booking to see the full picture — their answers to your booking questions, any files they uploaded, the video link, and the host it's assigned to.
Live screenshot to addThis site has no bookings yet, so the list is empty. Once a real booking exists, capture the populated Bookings list (and an opened booking's detail) and drop them in here.
Statuses — what each one means
Shown on every booking
A booking's status tells you where it stands at a glance. Confirmed is a normal live booking. Awaiting payment means it's a paid meeting whose money hasn't cleared yet (see Payments). Cancelled is off — the time is freed and the calendar event removed. Reschedules keep the same booking with a new time. You act on a booking by opening it and using the controls there.
Reschedule, cancel & mark paid
Bookings → open a booking
Open a booking to reschedule it (the invitee gets the "Rescheduled" note and the calendar event moves), cancel it (they get the "Cancelled" note and the slot reopens), or mark it paid if you took payment outside an auto-confirm webhook. Each action fires the right notification from Topic 7 automatically, so you never have to email the invitee yourself.
Reschedule vs cancel-and-rebook
Always reschedule when it's the same meeting at a new time — it keeps the history, the answers and the payment attached. Only cancel when the meeting genuinely isn't happening, since cancelling frees the slot and closes the record.
10 · Integrations & automation
Send bookings anywhere
A booking is a useful event for the rest of your stack — a Slack ping to the team, a new row in a CRM, a conversion counted in Google Ads. The Integrations screen pushes every booking event out to wherever you want it, and the Tracking settings tie bookings to your ad spend. None of it is required; add only the pieces you'll actually use.
Where booking events can go
Integrations
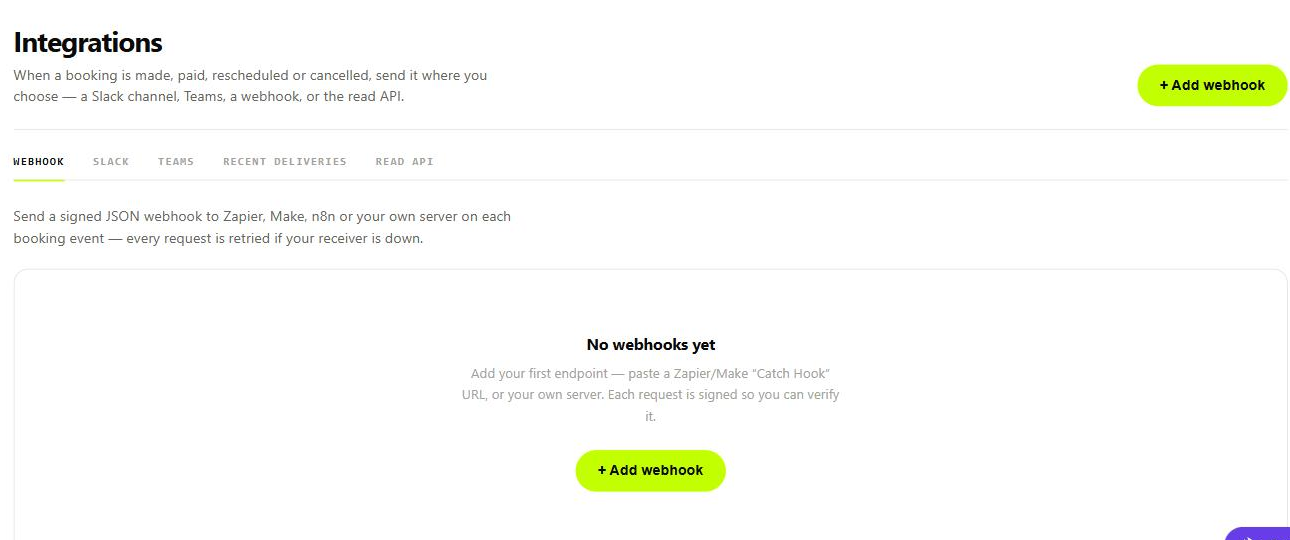
When a booking is made, paid, rescheduled or cancelled, the plugin can send it to a Slack channel, Microsoft Teams, a generic webhook, or expose it through the read API. Slack and Teams give your team a live feed; webhooks connect everything else.
Integrations One destination per tab — Slack, Teams, webhook, or the read API. Recent deliveries shows what actually went out.
Generic webhooks — Zapier, Make, n8n, your own server
Integrations → Webhook → + Add webhook
Paste a Zapier/Make "Catch Hook" URL, an n8n endpoint, or your own server, and each booking event is sent as a signed JSON payload. The signature lets your receiver verify it really came from your site. If your endpoint is down, the request is retried — so a brief outage doesn't lose a booking. This is the bridge to anything with an API: CRMs, spreadsheets, internal tools.
Debugging a webhook
Use the Recent deliveries tab to see each attempt and its response — the fastest way to tell "my endpoint rejected it" from "the plugin never fired." Start in a Zapier/Make test step so you can watch the payload arrive before wiring the real automation.
Track bookings as ad conversions
Settings → Tracking
If you run Google Ads, count a completed booking as a conversion so Google can optimise toward it. Add your Google Ads Conversion ID and label (and optionally a Tag Manager ID), and the plugin fires the conversion the moment a booking completes. Enhanced Conversions can send the booker's hashed email for better match rates.
If the booking page is embedded elsewhere
Every booking also pushes a j6_booking event to the dataLayer and posts it to the parent window. When the calendar is embedded in another site, drop the snippet from Settings → Tracking on the parent page so the conversion fires there — that's where your ad pixels live, and it gives the cleanest attribution.
Automations — send your own templates
Messaging → Automations
Separately from the outbound webhooks, Automations wire your reusable message templates to booking events — "when a Deep Dive is booked, send this WhatsApp; three days later, send that email." It's how you build sequences beyond the standard confirmation and reminders, all inside the plugin.
11 · Insights
See what's working
Insights turns your bookings into a simple read on demand for your time: how many meetings you're taking, how often they cancel, when your busy times fall, and which meeting types actually get booked. It's not a vanity dashboard — the point is to spot patterns you can act on, like a meeting type nobody books or a day that's always overloaded.
Filter to the view you want
Insights
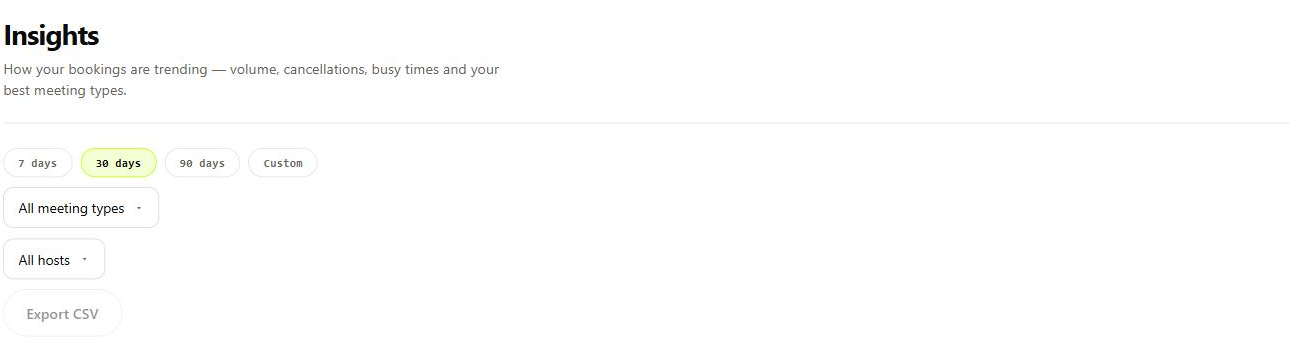
Pick a date range — 7, 30, 90 days or a custom span — then narrow by meeting type and, on a team, by host. The numbers below update to match. Export CSV pulls the underlying bookings out for your own spreadsheet or finance.
Insights Range and filters up top; trends, busiest times and best meeting types fill in below once bookings exist.
What the numbers tell you
Volume · cancellations · busy times · best types
Volume is your booking trend over the range — is demand rising or flat? Cancellations are worth watching as a rate: a type that cancels a lot may have the wrong notice window or too little qualification up front. Busy times show when bookings actually cluster, which is your cue to open or protect hours in Availability. Best meeting types tells you where to focus — and which starters to retire.
Live screenshot to addThis site has no bookings yet, so the charts are empty. Once real bookings exist, capture the populated Insights view (trends, busy times, best types) and add it here.
12 · Settings & privacy
Fine-tuning & your data
A few settings don't fit neatly under a feature but matter for quality and trust: keeping fake bookings out, deciding what you ask invitees for, and knowing what happens to your data. This topic gathers those, plus a quick word on your plan and seats.
Turn this on and a booking only completes after the invitee enters a one-time 8-digit code sent to their email (it expires in 10 minutes). Repeat bookers with a known email skip it, so it's low-friction for real people but stops bots and fake addresses cold. Worth enabling the moment you get any junk bookings.
Ask for the invitee's phone
Settings → Booking page → Ask for the invitee's phone
Three choices: don't ask, ask (optional), or ask (required). This adds a phone field to the booking form, checked in international format (e.g. +91 …). You need it if you want WhatsApp or SMS reminders to reach people — no number, no message. Otherwise keep the form short and leave it off.
Your data on uninstall
Settings → Data
By default your bookings and settings survive deactivating or reinstalling the plugin — so an accidental deactivation never wipes your history. One toggle, delete all bookings and settings if the plugin is uninstalled, opts into a clean wipe instead. Leave it off unless you specifically want removal to erase everything.
What leaves your site — and what doesn't
Bookings live in your own WordPress database. On the free bring-your-own-app path, calendar tokens are yours and never touch J6. On the one-click Connect plan, OAuth is brokered by J6 to keep setup keyless — it reads only free/busy and writes the event, never your event details.
Your plan & seats
Team & Calendars → plan header
Solo use is free on either connection path. Team hosting — more than one connected host, round-robin and collective meetings — runs on the one-click Connect plan, where the Team & Calendars header shows seats used vs available. A seat is consumed when a host connects a calendar, and freed when they disconnect, so you're only ever paying for people actually taking bookings.
13 · Troubleshooting
When something's off
Most snags trace back to one of three things: a calendar that isn't actually connected, an email that can't be sent, or a piece of plumbing (webhook, provider) that isn't finished. Here are the ones people hit, with the fix that usually clears them.
Busy times aren't blocking / no calendar event is created
Almost always the calendar isn't connected, or its token expired. Open Team & Calendars and check the host shows a green Connected — if it's grey, connect it; if it was connected before, hit Reconnect. Remember only the connected account blocks and receives events; a separate personal calendar you never linked won't.
A licence key won't activate
Licence keys only work on the one-click Connect path. If activation is refused, the site is almost certainly still in bring-your-own-app mode — switch it to Connect in one click first, then paste the key. The key and the plugin version are rarely the problem; the connection mode usually is.
"Google hasn't verified this app" (bring-your-own-app)
Expected while your own Google app is still unverified — it's your app, so it's safe. Click Advanced → continue to (your app) to proceed. Two ways to make it go away: publish/verify the app in Google Cloud, or switch to the one-click Connect plan, where J6's verified app is used and you never see this screen.
A bring-your-own Google connection drops after a few days
An unverified Google app in "testing" mode issues tokens that expire after 7 days — so the calendar keeps disconnecting. Fix it by moving the app from Testing to In production in the Google Cloud consent screen (or by verifying it). Or sidestep it entirely with the one-click Connect plan, whose tokens don't expire this way.
Reminders or confirmations aren't arriving
Two different causes. If no email arrives, it's deliverability — WordPress can't send mail reliably on its own; add an SMTP plugin or a sending service (Resend, SendGrid, SES) and use a from-address on your own domain. If email works but WhatsApp/SMS doesn't, check that the provider is connected in Settings → WhatsApp, that channel is toggled on for that message, and that you're asking invitees for a phone number.
Landing in spam
Sending from a free Gmail/Yahoo address through WordPress is the fastest route to the spam folder. Use your own domain and a real sending service, and set the from-name/from-email under Settings → Emails.
A paid booking didn't auto-confirm
The webhook isn't finishing the loop. Check that you pasted the webhook URL into the right gateway (Razorpay or Stripe — the one you actually charge with), and that the signing secret in Settings → Payments matches that gateway exactly. A mismatched secret means events fail signature verification and are ignored. In the meantime the booking sits as awaiting payment — you can always mark it paid by hand from Bookings.
Times look wrong to me or my invitees
The booking page always shows each visitor slots in their own time zone, and your hours are read in yours — so "wrong" usually means a host's time zone is set incorrectly. Check the host's zone in Availability (each host has their own) and the page default under Settings → Booking page. Once those are right, the conversions take care of themselves.
Still stuck?
Note exactly what you did, what you expected, and what happened instead — including the meeting type, the host, and any on-screen message — and send it along. The Recent deliveries tab under Integrations is gold for webhook issues, and a host's Connected status is the first thing to check for anything calendar-related.